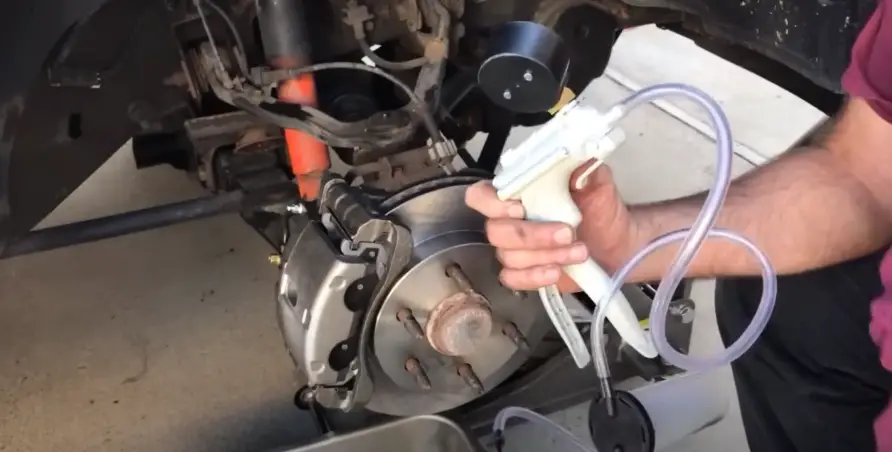
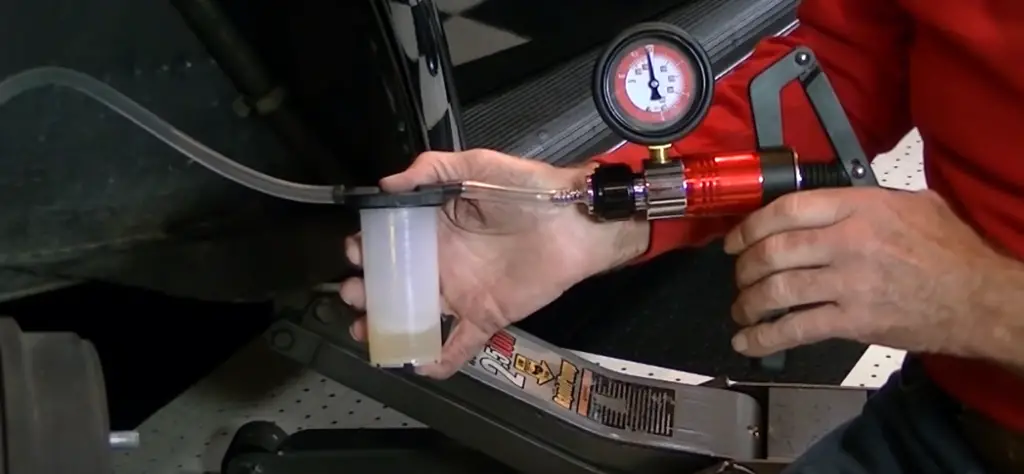
“To bleed brakes with a vacuum pump, first, secure the vehicle on a level surface and remove the wheels. Attach the vacuum pump to the bleeder valve on the brake caliper, then apply vacuum pressure to draw out air and old brake fluid. Refill the brake fluid reservoir as needed, and repeat the process until clear fluid flows without air bubbles. This method ensures a thorough and efficient brake bleeding process.”
Bleeding your car’s brakes is a crucial maintenance task that ensures your braking system is free of air bubbles, which can significantly impact braking performance. Using a vacuum pump to bleed brakes is an effective and efficient method that can be done at home with the right tools and a bit of know-how. This comprehensive guide will walk you through the step-by-step process of bleeding brakes with a vacuum pump, ensuring your vehicle remains safe and responsive on the road.

Contents
Importance of Bleeding Brakes
Brake fluid is the lifeblood of your braking system, transferring the force from your foot on the brake pedal to the brake calipers and pads, which then slow down or stop your vehicle. Over time, air can enter the brake lines, leading to spongy brakes and reduced braking efficiency. Bleeding the brakes removes this air, ensuring the brake system operates effectively.
How to Bleed Brakes with Vacuum Pump
Before you begin, gather the following tools and materials:
- Vacuum pump with brake bleeding kit
- Fresh brake fluid (consult your vehicle’s manual for the correct type)
- Jack and jack stands or ramps
- Lug wrench
- Wrench or socket set (for bleeder valves)
- Catch container for old brake fluid
- Safety glasses and gloves
- Clean rags or paper towels
Safety Precautions
Bleeding brakes involves handling brake fluid, which is corrosive and harmful. Follow these safety precautions:
- Wear protective gear: Always wear safety glasses and gloves to protect yourself from brake fluid splashes.
- Work in a well-ventilated area: Brake fluid fumes can be harmful if inhaled in large quantities.
- Avoid spills: Brake fluid can damage paint and other surfaces. Clean up any spills immediately with water and a rag.
- Properly dispose of old brake fluid: Collect old brake fluid in a catch container and dispose of it according to local regulations.
Step-by-Step Guide to Bleeding Brakes with a Vacuum Pump
Follow the steps below to do the job successfully –
1. Prepare Your Vehicle
- Park on a Level Surface: Ensure your vehicle is parked on a flat, level surface. Engage the parking brake.
- Lift the Vehicle: Use a jack to lift the vehicle and secure it on jack stands or ramps. Remove the wheels to access the brake calipers.
2. Locate the Brake Bleeder Valves
- Identify the Bleeder Valves: Locate the bleeder valves on each brake caliper. These are typically small valves located near the top of the caliper. Consult your vehicle’s manual if you’re unsure.
3. Attach the Vacuum Pump
- Set Up the Vacuum Pump: Assemble the vacuum pump according to the manufacturer’s instructions. Attach the catch container to the pump.
- Connect the Pump to the Bleeder Valve: Attach the vacuum pump hose to the bleeder valve on the first brake caliper. Ensure a tight connection to avoid air leaks.
4. Bleed the Brakes
- Apply Vacuum Pressure: Pump the vacuum pump to create a vacuum. This will start drawing brake fluid and air out of the brake line into the catch container.
- Open the Bleeder Valve: Using a wrench, slowly open the bleeder valve. Fluid and air bubbles will start to flow through the hose into the catch container.
- Monitor Fluid Level: Keep an eye on the brake fluid reservoir under the hood. As fluid is drawn out, the level will drop. Refill the reservoir with fresh brake fluid as needed to prevent air from being drawn into the system.
- Close the Bleeder Valve: Once you see a steady stream of clear fluid without air bubbles, close the bleeder valve. This indicates that the air has been purged from the brake line.
- Repeat for Each Brake: Move to the next brake caliper and repeat the process. Typically, the bleeding order is: starting with the furthest brake from the master cylinder (usually the rear passenger side), followed by the rear driver side, front passenger side, and finally the front driver side.
5. Final Checks and Clean-Up
- Check Brake Pedal Feel: After bleeding all brakes, press the brake pedal to ensure it feels firm. If it still feels spongy, there may still be air in the lines, and you should repeat the bleeding process.
- Inspect for Leaks: Check around the bleeder valves and brake lines for any signs of leaks.
- Reinstall Wheels: Once satisfied, reinstall the wheels and lower the vehicle off the jack stands or ramps.
- Dispose of Old Brake Fluid: Properly dispose of the old brake fluid collected in the catch container.

Tips for Effective Brake Bleeding
- Use the Correct Brake Fluid: Always use the type of brake fluid specified by your vehicle’s manufacturer.
- Avoid Contaminating Brake Fluid: Keep the brake fluid container sealed when not in use to prevent moisture absorption.
- Work Methodically: Bleed one brake at a time, and ensure each bleeder valve is closed before moving to the next.
- Keep the Reservoir Full: Continuously monitor and refill the brake fluid reservoir to avoid introducing air into the system.
Conclusion
Bleeding your brakes with a vacuum pump is a straightforward and effective way to maintain your vehicle’s braking performance. By following this step-by-step guide and taking proper safety precautions, you can ensure your brake system is free of air and functioning optimally. Regular brake maintenance is crucial for safe driving, and learning to bleed brakes yourself can save you time and money while giving you confidence in your vehicle’s safety.
Whether you’re a seasoned DIY mechanic or a car enthusiast, mastering the technique of bleeding brakes with a vacuum pump is a valuable skill. With the right tools and a careful approach, you can keep your brakes in top condition and enjoy a smoother, safer driving experience.