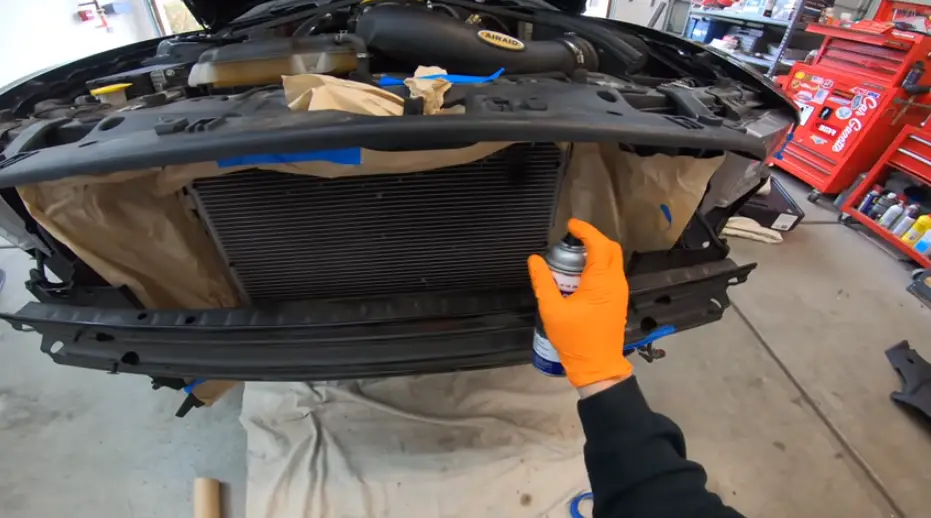
To paint a car radiator, clean and sand the surface, then apply thin coats of high-temperature radiator paint. Avoid heavy layers to maintain airflow. Let it dry for 24 hours before use.
Painting your car’s radiator can improve its appearance and even provide added protection against rust and corrosion. While it may sound straightforward, painting a radiator requires careful preparation, the right tools, and attention to detail to ensure the paint adheres well without compromising the radiator’s efficiency. This guide will walk you through each step to achieve a professional-looking finish.

Contents
- 1 Why Paint a Car Radiator?
- 2 How to Paint a Car Radiator
- 2.1 Materials Needed
- 2.2 Step 1: Preparation and Safety Measures
- 2.3 Step 2: Remove or Mask Off the Radiator
- 2.4 Step 3: Clean the Radiator
- 2.5 Step 4: Sand the Radiator
- 2.6 Step 5: Apply Primer (Optional)
- 2.7 Step 6: Apply the Radiator Paint
- 2.8 Step 7: Inspect and Reassemble
- 2.9 Tips for Painting a Radiator Safely and Effectively
- 3 Frequently Asked Questions
- 4 Conclusion
Why Paint a Car Radiator?
There are several reasons why you might consider painting your car’s radiator:
- Aesthetic Appeal: A fresh coat of paint can enhance the look of your engine bay, giving it a cleaner and more cohesive look.
- Rust Prevention: High-quality radiator paint can prevent corrosion, extending the life of the radiator.
- Resale Value: A well-maintained and attractive radiator can improve your vehicle’s resale appeal.
However, it’s crucial to use the right materials and techniques so the radiator’s efficiency isn’t affected, as improper paint application can inhibit heat dissipation.
How to Paint a Car Radiator
Painting a car radiator can be a great way to restore its appearance or protect it from rust and corrosion. Below is a step-by-step guide to help you paint a car radiator:
Materials Needed
Here’s a list of materials you’ll need for painting a car radiator:
- High-Temperature Radiator Paint: Specially formulated radiator paints allow heat dissipation. Regular paints can insulate the radiator, causing overheating issues.
- Primer (Optional): High-temperature primer can be used if the radiator is severely rusted or if you want to ensure a better bond for the paint.
- Sandpaper: 320-grit sandpaper works well for lightly scuffing the surface, while 600-grit is good for smoothing.
- Degreaser: To clean off any oil or dirt on the radiator surface.
- Masking Tape and Paper: For masking off areas you don’t want to paint, like hoses or fittings.
- Paint Sprayer or Aerosol Can: Radiator paint often comes in spray cans, but if you prefer to use a paint sprayer, make sure to dilute the paint as directed.
- Protective Gear: Gloves, a mask, and goggles to protect yourself from fumes.
Step 1: Preparation and Safety Measures
Before you begin, park your car in a well-ventilated area, such as a garage with open doors or an outdoor space. Turn off the engine, and let the radiator cool completely if it was recently used. Wear safety goggles, a mask, and gloves to protect yourself from paint fumes and dust.
Step 2: Remove or Mask Off the Radiator
If possible, remove the radiator from the car for easier access and better paint coverage. However, if removing the radiator isn’t feasible, use masking tape and paper to cover areas around the radiator, such as hoses, engine components, and the surrounding frame.
Step 3: Clean the Radiator
Use a degreaser to remove any dirt, grime, or oil on the radiator surface. Follow up by rinsing with water and allowing it to dry completely. A clean surface ensures better adhesion for the paint.
Step 4: Sand the Radiator
Using 320-grit sandpaper, gently sand the radiator’s surface to remove any rust and smooth out imperfections. Be cautious not to sand down to the core metal, as this could damage the radiator. Once you’ve sanded, use a cloth to wipe away dust and any residue.
Step 5: Apply Primer (Optional)
If your radiator has rust spots or if you want to add a layer of adhesion for the paint, apply a high-temperature primer. Spray a thin coat, ensuring even coverage across the radiator. Let the primer dry for at least an hour before moving on to the paint step.
Step 6: Apply the Radiator Paint
- Shake the Paint Can: If using aerosol radiator paint, shake the can thoroughly for at least one minute to ensure the paint is well-mixed.
- Apply Light Coats: Begin spraying in a sweeping motion about 12 inches away from the surface. Apply light, even coats, allowing each coat to dry for 15-20 minutes before applying the next. Avoid applying heavy coats, as this can lead to dripping and uneven coverage.
- Let the Paint Dry: After applying 2-3 light coats, let the paint dry for at least 24 hours before handling. If you removed the radiator from the vehicle, ensure it’s completely dry before reinstallation.
Step 7: Inspect and Reassemble
After the paint has dried, inspect the radiator for any missed spots or uneven areas. If everything looks good, carefully remove any masking materials and reinstall the radiator if it was removed.

Tips for Painting a Radiator Safely and Effectively
When painting a radiator, safety and effectiveness are crucial to achieving a professional and long-lasting result. Here are some helpful tips to guide you:
- Use High-Temperature Paint: Only use paint designed for radiators or engine components. Regular paint can reduce heat dissipation and affect the radiator’s performance.
- Avoid Clogging the Fins: Ensure that you don’t apply too much paint to the radiator fins, as this can block airflow and reduce cooling efficiency.
- Check Local Regulations: In some areas, using aerosol paints in residential spaces may have restrictions. Be sure to check local guidelines if applicable.
Frequently Asked Questions
Here are some FAQs about painting a car radiator –
1. Can I use regular spray paint on my radiator?
No, regular spray paint is not designed to withstand the high temperatures radiators reach, and it may reduce heat dissipation, potentially causing overheating issues. Always use a high-temperature radiator paint.
2. Will painting my radiator affect its cooling performance?
If you use the correct high-temperature radiator paint and apply it in thin layers, it won’t significantly impact cooling performance. Avoid applying thick coats or clogging the fins, as this can reduce airflow.
3. Can I paint the radiator without removing it from the car?
Yes, it’s possible to paint the radiator without removing it, but you’ll need to mask off surrounding components carefully to avoid overspray. However, removing the radiator allows for easier and more thorough painting.
4. Do I need a primer before painting?
While primer isn’t always necessary, it can be beneficial if the radiator is rusty or if you want to ensure the paint adheres better. Use a high-temperature primer if you choose to apply one.
5. How long should I wait before starting the engine after painting the radiator?
Wait at least 24 hours for the paint to cure completely. This ensures that the paint has dried thoroughly and will adhere properly under the heat of the engine.
Conclusion
Painting your car’s radiator is an excellent way to enhance its appearance and protect it from rust, but it requires careful preparation and the right materials. Using high-temperature radiator paint, applying thin coats, and allowing proper drying time will help you achieve a durable, professional-looking finish without affecting radiator performance. With the right approach, you can give your radiator a fresh look and keep it functioning efficiently for years to come.