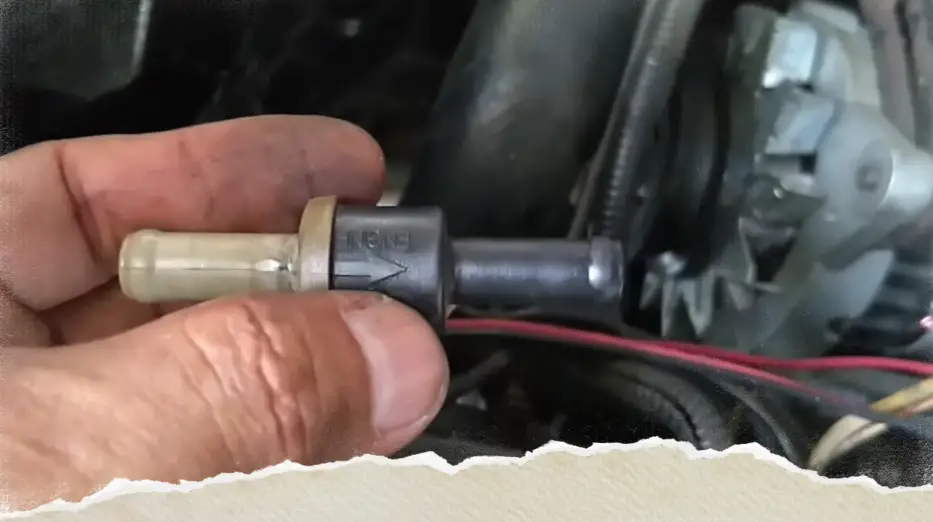
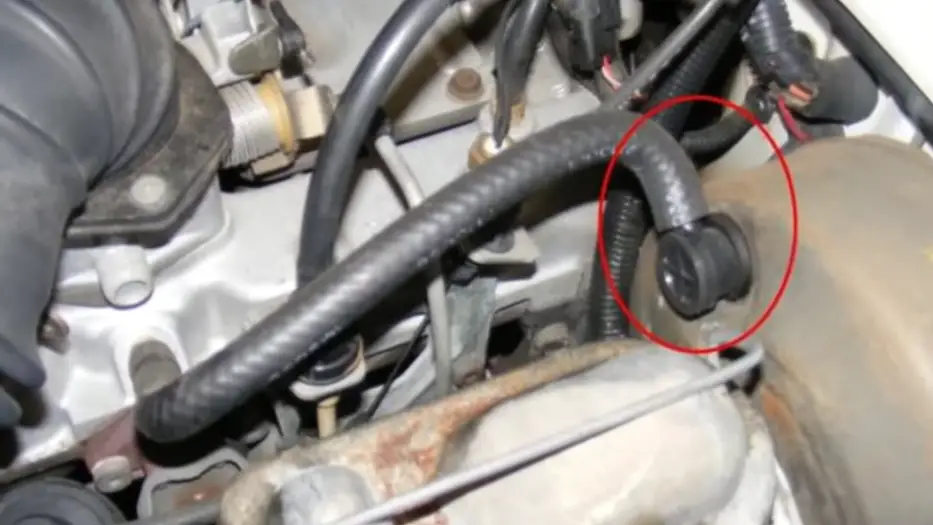
To test a power brake booster check valve, first locate the valve on the brake booster and inspect it for any visible damage or loose connections. Next, remove the valve and use a vacuum pump to check if it maintains a vacuum; if it loses pressure or allows air through in the wrong direction, the valve is faulty and needs replacement. Reinstall the valve securely and ensure there are no leaks.
The power brake booster check valve is a small yet crucial component in a vehicle’s braking system, ensuring safe and efficient braking. This one-way valve maintains a vacuum within the brake booster, enabling the power brakes to function properly. When the check valve fails, it can lead to hard brake pedals, reduced braking efficiency, or even complete brake failure.
Contents
What is a Power Brake Booster Check Valve?
A power brake booster check valve is a one-way valve located on the brake booster, which is typically found between the brake booster and the engine’s intake manifold. The brake booster uses vacuum pressure from the engine to amplify the force applied to the brake pedal, reducing the amount of effort needed to stop the vehicle.
The check valve ensures that the vacuum remains constant within the brake booster, preventing it from losing pressure when the engine is turned off or during rapid deceleration.
Components of the Check Valve:
- Body: The main housing of the valve, usually made from plastic or metal.
- Diaphragm: A flexible membrane that opens or closes based on pressure differentials.
- Port Connections: Openings for connecting the valve to the brake booster and the engine’s intake manifold.

Why is the Check Valve Important?
The check valve is critical for maintaining the proper function of the power brake system. It allows vacuum pressure to build up in the brake booster and keeps it from escaping back to the engine. If the check valve fails, the brake booster may not receive adequate vacuum pressure, resulting in a hard brake pedal and diminished braking performance. This could pose a significant safety risk, especially in emergency situations where quick stopping is necessary.
How to Test a Power Brake Booster Check Valve
Testing the power brake booster check valve is a relatively simple process that can be done with basic tools. Follow these steps to determine if the check valve is functioning properly:
Tools Required:
- Vacuum pump (manual or electric)
- Pliers or a wrench
- Screwdriver
- Safety gloves
Step-by-Step Process of Testing a Power Brake Booster Check Valve
Here is a step-by-step process to test a power brake booster check valve:
Step 1: Locate the Check Valve
- Identify the Brake Booster:
The brake booster is typically mounted on the firewall, behind the engine compartment, near the driver’s side. It looks like a round, black metal canister attached to the master cylinder. - Find the Check Valve:
The check valve is usually a small plastic or metal component inserted into the brake booster housing. It has one or more hoses connected to it, leading to the engine’s intake manifold.
Step 2: Inspect the Check Valve and Hoses
- Visual Inspection:
Check the check valve and the hoses connected to it for any visible signs of damage, such as cracks, breaks, or loose connections. Make sure the hoses are securely attached to the check valve and the intake manifold. - Listen for Hissing Sounds:
With the engine running, listen for any hissing noises around the check valve area. A hissing sound could indicate a vacuum leak.
Step 3: Perform a Vacuum Test
- Remove the Check Valve:
Using pliers or a wrench, carefully disconnect the hose from the check valve. If necessary, use a screwdriver to loosen any clamps securing the valve in place. Remove the check valve from the brake booster. - Attach a Vacuum Pump:
Connect a manual or electric vacuum pump to the engine side of the check valve. Ensure the pump is securely attached to prevent any air leaks. - Test the Valve’s Function:
- Apply Vacuum: Use the vacuum pump to create a vacuum on the engine side of the check valve. Observe the vacuum gauge on the pump.
- Monitor Vacuum Retention: The check valve should hold the vacuum and not lose pressure. If the vacuum gauge shows a drop in pressure, the check valve is leaking and needs replacement.
- Reverse Test:
- Switch the vacuum pump to the brake booster side of the check valve.
- Attempt to create a vacuum. If the valve allows air to pass in this direction, it is defective and must be replaced.
Step 4: Reinstall the Check Valve
- Reattach the Check Valve:
Once the check valve has passed the test or is replaced, reinstall it by connecting it back to the intake manifold and brake booster hoses. Ensure all connections are tight and secure. - Check for Leaks:
Start the engine and press the brake pedal to check for any leaks or hissing sounds. Make sure the brake pedal feels firm and responsive.
Tips for Success:
- Perform the Test Safely: Always wear safety gloves and goggles while working under the hood.
- Use the Right Tools: A quality vacuum pump will give more accurate results than a DIY method.
- Replace Damaged Components: If the check valve is damaged, replace it immediately to maintain safe braking performance.

Frequently Asked Questions
Here are some FAQs about the testing brake booster check valve –
- What is the role of a brake booster check valve?
The brake booster check valve maintains a one-way flow of vacuum from the engine to the brake booster, ensuring that sufficient vacuum pressure is retained within the booster for efficient braking. - How do I know if my brake booster check valve is faulty?
Symptoms of a faulty check valve include a hard brake pedal, reduced braking power, hissing noise, engine stalling, and a brake warning light on the dashboard. - Can I drive with a bad brake booster check valve?
Driving with a faulty check valve is dangerous as it can result in reduced braking performance and increased stopping distances, which can lead to accidents. - How often should I check the brake booster check valve?
It is advisable to inspect the check valve during routine brake system maintenance or if you experience any symptoms indicating a possible malfunction. - Is it expensive to replace a brake booster check valve?
The cost of a replacement check valve is relatively low, usually ranging from $10 to $30, but labor costs may vary depending on your vehicle’s make and model.
Conclusion
Testing the power brake booster check valve is a critical aspect of maintaining your vehicle’s braking system. A faulty check valve can lead to reduced braking efficiency and compromised safety, making it essential to diagnose and repair any issues promptly.