A water pump gasket is an essential component of an engine’s cooling system. It helps to prevent coolant leaks and keeps the engine running at an optimal temperature. However, a faulty water pump gasket can cause significant engine damage, leading to expensive repairs. That’s why it’s crucial to properly seal a water pump gasket. In this guide, we’ll show you how to properly seal a water pump Gasket.
How to Properly Seal a Water Pump Gasket
Before you get started, it’s essential to gather all the necessary supplies. Here’s what you’ll need:
- A new water pump gasket
- A tube of high-temperature silicone gasket maker
- A scraper or razor blade
- A torque wrench
- A socket set
- A torque angle gauge (optional)
Step-by-Step Guide to Properly Seal a Water Pump Gasket
Follow the steps below to seal the water pump gasket properly –
Remove the Old Gasket
The first step in properly sealing a water pump gasket is to remove the old gasket. Use a scraper or razor blade to carefully remove any old gasket material from the engine block and water pump.
Clean the Surfaces
Once the old gasket material has been removed, it’s time to clean the surfaces. Use a clean rag and some brake cleaner or carburetor cleaner to remove any remaining debris or oil from the engine block and water pump surfaces.
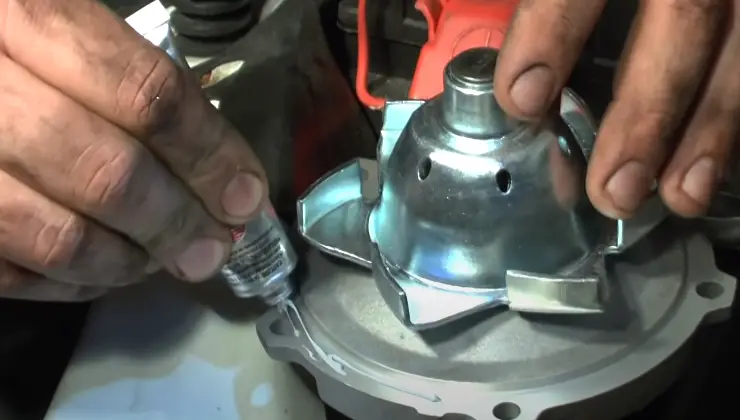
Apply the Silicone Gasket Maker
Now it’s time to apply the silicone gasket maker. Squeeze a bead of silicone around the water pump bolt holes and the edge of the water pump surface that will contact the gasket. Be careful not to overdo it, as too much silicone can cause problems.
Install the New Gasket
Carefully place the new gasket on the water pump surface, ensuring that it’s properly aligned with the bolt holes. Then, carefully place the water pump onto the engine block, making sure that the gasket stays in place.
Tighten the Bolts
Use your socket set and torque wrench to tighten the water pump bolts to the manufacturer’s specifications. If the manufacturer specifies a torque angle, use a torque angle gauge to ensure proper torque.
Let the Gasket Maker Cure
Allow the silicone gasket maker to cure for the amount of time specified by the manufacturer. This usually takes several hours, but refer to the product label for exact curing times.
Frequently Asked Questions
Here are some FAQs searched the online –
Q: What causes a water pump gasket to fail?
A: A water pump gasket can fail due to a variety of reasons, including age, heat, and pressure.
Q: How often should a water pump gasket be replaced?
A: It’s recommended to replace the water pump gasket every time the water pump is replaced.
Q: Can I reuse an old water pump gasket?
A: It’s not recommended to reuse an old water pump gasket, as it may not seal properly.
Q: Can I use regular silicone instead of high-temperature silicone gasket maker?
A: No, regular silicone is not designed for use in high-temperature applications and may fail.
Q: What happens if a water pump gasket is not properly sealed?
A: If a water pump gasket is not properly sealed, coolant leaks can occur, leading to engine damage and costly repairs.
Q: Can I hand-tighten the water pump bolts?
A: No, it’s important to use a torque wrench to ensure that the water pump bolts are tightened to the correct specifications.
Q: How do I know when the silicone gasket maker has cured?
A: Refer to the product label for exact curing times. Once the silicone gasket maker has cured, it
Should feel firm to the touch and have a solid texture.
Q: Can I use a different torque specification than what’s recommended by the manufacturer?
A: No, it’s important to follow the manufacturer’s torque specifications to ensure proper sealing and avoid damage to the engine.
Conclusion
Properly sealing a water pump gasket is a critical component of maintaining a healthy engine. By following these simple steps and using the right tools and materials, you can ensure that your water pump gasket is sealed correctly and help prevent costly engine damage. Remember to always refer to the manufacturer’s instructions and specifications and to take your time to do the job right.
