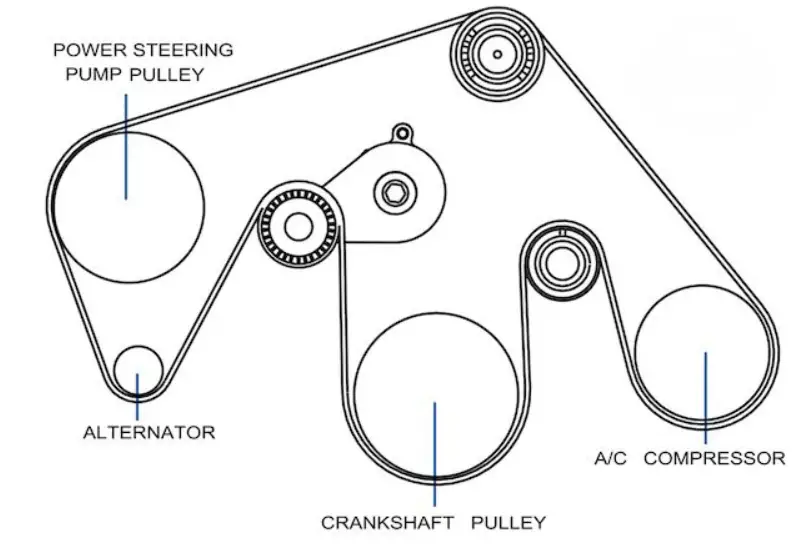
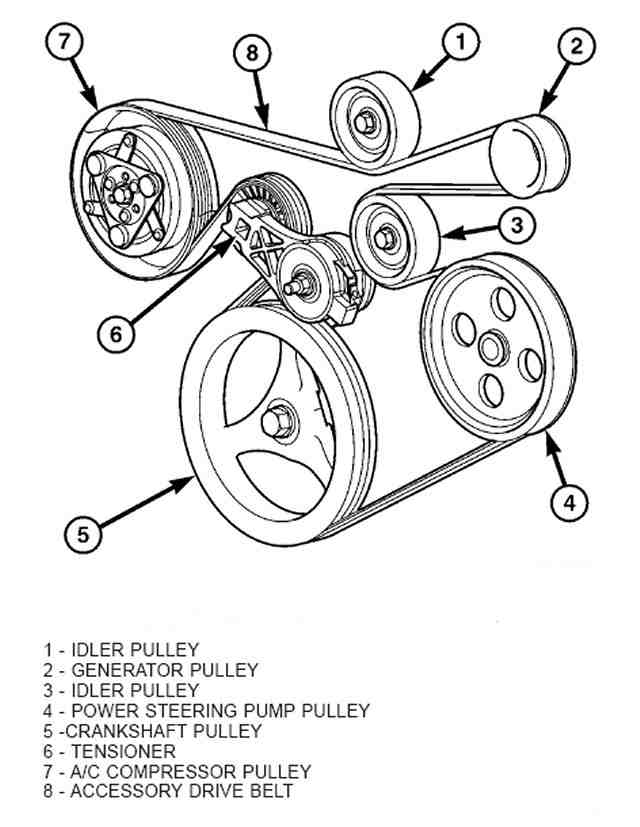
Serpentine belt routing is the path the belt takes around engine components to power systems like the alternator and water pump. Correct routing ensures smooth operation and prevents wear.
The serpentine belt, sometimes known as a drive belt, is a single, continuous belt used in many modern engines to drive various engine accessories. It wraps around several components, providing efficient power transmission to keep your vehicle’s essential systems, such as the alternator, air conditioning, power steering pump, and water pump, operating smoothly. Proper serpentine belt routing is crucial for vehicle performance, fuel efficiency, and engine longevity.
In this guide, we’ll explore the importance of the serpentine belt, how to identify and understand belt routing, and provide detailed insights into routing diagrams and belt replacement.

Contents
What is a Serpentine Belt?
The serpentine belt is a long, winding belt that wraps around multiple engine components, providing rotational power from the engine’s crankshaft to these accessories. Unlike older vehicles that used multiple V-belts, modern engines utilize a single serpentine belt, which reduces complexity and improves efficiency.
Serpentine Belt Routing
Serpentine belt routing refers to the specific path the belt follows around the various engine pulleys. Routing varies from vehicle to vehicle, depending on the design and layout of the engine components. Proper belt routing is essential to prevent the belt from slipping or wearing prematurely, which can lead to component failure or a complete breakdown.
Key Components in Serpentine Belt Routing
Key components in serpentine belt routing include:
- Crankshaft Pulley: This pulley is connected to the crankshaft, and it powers the serpentine belt.
- Alternator Pulley: The belt drives the alternator, which generates electricity to recharge the battery and power the vehicle’s electrical systems.
- Water Pump Pulley: This pulley drives the water pump, which circulates coolant through the engine to prevent overheating.
- Power Steering Pump Pulley: The belt powers this pump, providing hydraulic pressure to assist with steering.
- Air Conditioning Compressor Pulley: The belt drives the A/C compressor, allowing the air conditioning system to function.
- Idler Pulley: These pulleys help guide and support the belt, ensuring proper alignment and tension.
- Tensioner Pulley: This is an adjustable pulley that maintains consistent tension on the belt, which prevents slipping and ensures smooth operation.
Each engine has a unique layout of these pulleys, so following the correct routing path is vital to ensure that all components receive adequate power.
How to Read Serpentine Belt Routing Diagrams
Many vehicles have a serpentine belt routing diagram located on a decal in the engine bay, often near the radiator or on the underside of the hood. If the diagram isn’t present, it’s typically included in the vehicle’s owner’s manual or can be found online.
Reading the Diagram
Reading a serpentine belt routing diagram involves understanding the belt’s path around various pulleys. Here’s how:
- Identify Pulley Types: On the diagram, each pulley type (alternator, water pump, crankshaft, etc.) is labeled, so you can match it to the physical components in the engine bay.
- Direction of Rotation: The diagram will show arrows indicating the belt’s direction as it wraps around each pulley.
- Tensioner and Idler Placement: These pulleys are often marked with “T” for the tensioner and “I” for the idler. These components are essential for maintaining proper belt alignment and tension.
- Belt Pathing: Follow the belt’s path exactly as shown in the diagram, ensuring it loops around each pulley in the correct direction.
Incorrect routing can cause the belt to slip, wear unevenly, or even break, which could result in a complete loss of power to critical systems. Always double-check the routing before starting the engine after replacing a serpentine belt.

Frequently Asked Questions
Here are some FAQs about serpentine belt routing –
1. How do I know if my serpentine belt needs replacement?
Look for signs such as squealing noises, visible cracks, loss of power to accessories, or an overheating engine. Regular inspection every 50,000 miles is recommended.
2. Can I replace a serpentine belt myself, or should I go to a mechanic?
Replacing a serpentine belt is relatively straightforward and can be done by DIY enthusiasts. However, if you’re unfamiliar with engine components, a mechanic can ensure proper installation.
3. What happens if the serpentine belt routing is incorrect?
Incorrect routing can lead to uneven belt wear, slipping, and insufficient power to accessories. In some cases, it can cause the belt to break, leading to loss of power steering, air conditioning, and potential overheating.
4. Can I drive my car without a serpentine belt temporarily?
It’s not advisable to drive without a serpentine belt, as essential systems like the alternator, water pump, and power steering won’t function, increasing the risk of engine damage and reducing vehicle safety.
5. How much does it cost to replace a serpentine belt?
The cost varies depending on vehicle make and model. A serpentine belt replacement typically ranges from $50 to $200 for parts and labor if done by a professional.
Conclusion
Understanding serpentine belt routing is essential for maintaining your vehicle’s performance and longevity. With proper maintenance and timely replacement, the serpentine belt ensures that critical systems in your engine remain functional. Whether you choose to tackle this task yourself or prefer the expertise of a mechanic, following the correct belt routing path and replacing a worn belt in a timely manner will save you from potential breakdowns and costly repairs.